 Pin It
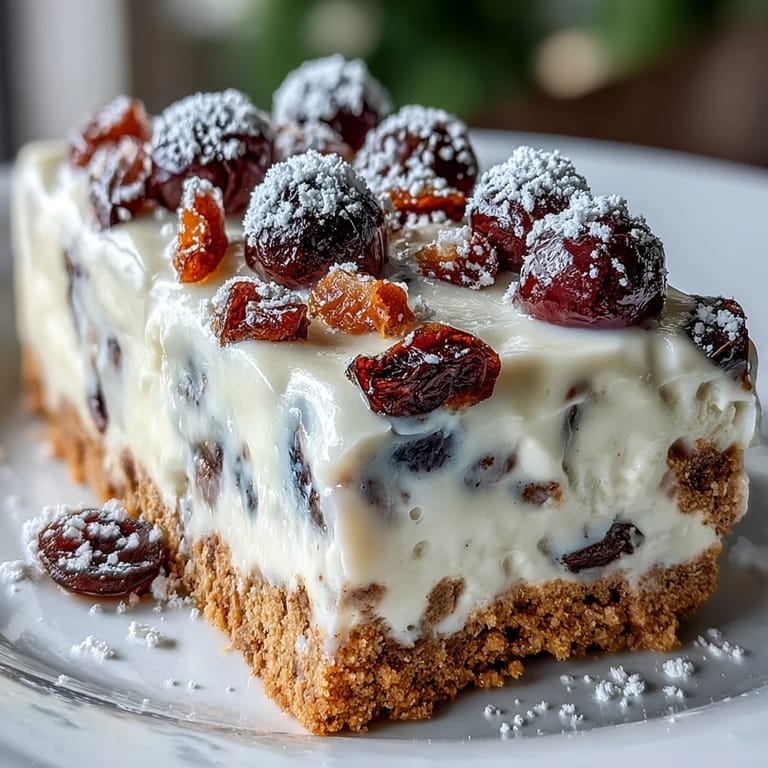
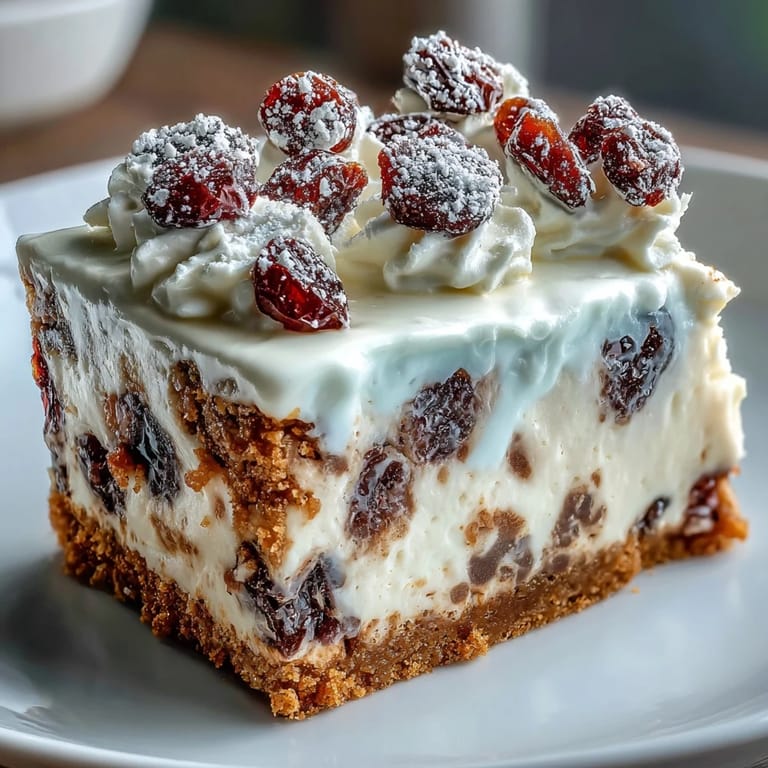
 The kitchen smelled like cloves and butter when I pulled this cheesecake from the oven on a snowy December evening. I wasn't sure if the spices would work with the tangy cream cheese, but the moment I tasted a cooled corner piece, I understood why my neighbor had scribbled this recipe on the back of a Christmas card. It's become the dessert I bake when I want something impressive without the fuss of individual servings. Every square holds a little pocket of holiday warmth, and no one ever guesses how simple it really is. The hardest part is waiting for it to set.
I brought this to a Boxing Day gathering once, and it disappeared faster than the turkey sandwiches. A friend asked if I'd bought it from a bakery, which made me laugh because I'd been mixing the batter in my pajamas that morning. The dried fruits soften just enough to add bursts of sweetness without turning mushy. Since then, I've made it every year, sometimes swapping cranberries for candied ginger when I'm feeling adventurous. It's the kind of dessert that makes people linger at the table a little longer.
Ingredients
- Digestive biscuits: These create a sturdy, slightly sweet base that won't crumble when you slice into squares, and their malty flavor balances the rich filling beautifully.
- Unsalted butter: Melted and mixed with the biscuit crumbs, it binds everything together and adds a buttery depth that salted versions would overpower.
- Cream cheese: Room temperature is essential here because cold cream cheese creates lumps no amount of beating will fix, and smooth batter means a silky finished cheesecake.
- Granulated sugar: Just enough sweetness to let the spices and tangy cream cheese shine without tipping into cloying territory.
- Sour cream: This adds a gentle tang and keeps the texture light and creamy instead of dense and heavy.
- Large eggs: They give structure to the filling, so make sure they're at room temperature to blend smoothly and prevent the batter from splitting.
- Vanilla extract: A warm, familiar note that ties the spices and citrus together without stealing the spotlight.
- Lemon zest: Brightens the whole filling and cuts through the richness with a fresh, zesty lift.
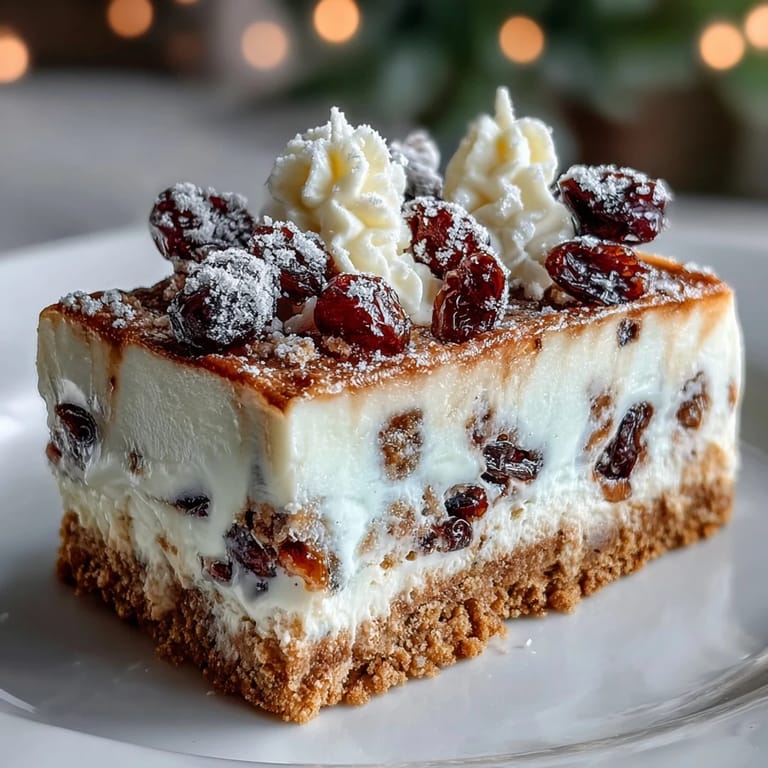
- Mixed dried fruits: Cranberries, apricots, and cherries add chewy pockets of sweetness and a festive jewel tone to every slice.
- Mixed spice: Cinnamon, nutmeg, and ginger create that unmistakable holiday aroma that fills your kitchen and makes everyone ask what's baking.
- Double cream: Whipped soft and sweetened lightly, it crowns each square with a cloud of richness.
- Icing sugar: A dusting on top looks like fresh snow and adds a final touch of sweetness.
Tired of Takeout? 🥡
Get 10 meals you can make faster than delivery arrives. Seriously.
One email. No spam. Unsubscribe anytime.
Instructions
- Preheat and Prepare:
- Set your oven to 160°C (320°F) and line a 20 x 30 cm rectangular baking tray with parchment paper, leaving a generous overhang on the sides. This overhang becomes your handle for lifting the whole slab out later, which saves you from wrestling with a spatula.
- Make the Biscuit Base:
- Blitz the digestive biscuits in a food processor until they're fine crumbs, then stir in the melted butter until the mixture looks like wet sand. Press it firmly and evenly into the base of the tray, using the bottom of a glass to compact it if your hands aren't doing the job.
- Chill the Base:
- Pop the tray into the fridge while you prepare the filling. This step firms up the base so it doesn't mix with the batter when you pour it on.
- Beat the Cream Cheese:
- In a large bowl, beat the cream cheese with an electric mixer until it's completely smooth and lump free. Gradually add the sugar and beat until the mixture is pale and fluffy, scraping down the sides of the bowl as you go.
- Add Wet Ingredients:
- Pour in the sour cream, crack in the eggs one at a time, then add the vanilla extract and lemon zest. Beat until the batter is smooth, glossy, and slightly thick, like soft custard.
- Fold in Fruits and Spice:
- Gently fold in the chopped dried fruits and mixed spice with a spatula, using slow sweeping motions to keep the batter airy. You want the fruits evenly scattered, not sunk to the bottom.
- Assemble and Smooth:
- Pour the cheesecake batter over the chilled biscuit base and smooth the surface with a spatula. Tap the tray gently on the counter a few times to release any trapped air bubbles that might cause cracks.
- Bake Low and Slow:
- Bake for 45 to 50 minutes, or until the edges are set and the center still has a slight wobble when you shake the tray. If the top starts browning too quickly, loosely tent it with foil to protect the surface.
- Cool in the Oven:
- Turn off the oven and leave the cheesecake inside with the door closed for 1 hour. This gradual cooling prevents the dreaded crack across the top.
- Chill Thoroughly:
- Remove the cheesecake from the oven and let it cool to room temperature, then refrigerate for at least 4 hours or overnight. The longer it chills, the cleaner your slices will be.
- Whip the Cream:
- Just before serving, whisk the double cream with 2 tablespoons of icing sugar until soft peaks form. Don't overbeat or you'll end up with butter instead of cream.
- Slice and Serve:
- Use the parchment overhang to lift the cheesecake out of the tray, then slice into neat squares with a sharp knife wiped clean between cuts. Top each square with a dollop of whipped cream and a light dusting of icing sugar.
 Pin It
 The first time I served this, my cousin asked if she could take the leftovers home, and I watched her wrap three squares in foil like they were treasure. She texted me two days later saying she'd eaten them for breakfast with black coffee. That's when I realized this cheesecake doesn't just belong at the holiday table. It's the kind of thing you make when you want to give someone a little edible joy, no occasion required.
Storing and Freezing
This cheesecake keeps beautifully in the fridge for up to five days, covered loosely with cling film so the top doesn't dry out. If you want to freeze it, slice it into individual squares, wrap each one in parchment paper, then stack them in an airtight container. They'll hold for up to a month, and you can thaw a square or two whenever the craving hits. I've pulled frozen squares out on a Wednesday night and let them defrost in the fridge overnight, and they taste just as good as fresh.
Customizing Your Cheesecake
You can swap the dried fruits for candied peel, fresh raspberries, or even chocolate chips if you're not married to the traditional route. I've made a version with chopped stem ginger and dark chocolate that disappeared at a New Year's party. If you're not a fan of mixed spice, try cardamom and orange zest for a brighter, more floral flavor. The base recipe is forgiving enough to handle your experiments, so don't be afraid to follow your taste buds.
Serving Suggestions
I like to serve this with a glass of sweet dessert wine or a mug of spiced tea on the side. The whipped cream on top is essential because it adds a soft, cool contrast to the dense filling. If you're feeling extra, drizzle a little toffee sauce or sprinkle crushed pistachios over the cream before dusting with icing sugar.
- Pair with mulled wine or a hot toddy for a cozy winter dessert moment.
- Serve cold straight from the fridge or let it sit at room temperature for ten minutes to soften slightly.
- Garnish with a sprig of fresh rosemary or a few whole dried cranberries for a festive touch.
 Pin It
 This cheesecake has become my quiet holiday tradition, the one I make even when no one's coming over. It fills the house with warmth and makes the season feel a little more magical, one spiced, creamy square at a time.
Recipe FAQs
- → Can I make this cheesecake ahead of time?
Absolutely. This cheesecake actually improves when made a day ahead. The flavours develop and the texture becomes perfectly set. Prepare it up to 24 hours before serving, or freeze individual squares for up to one month.
- → What size tin do I need?
You'll need a 20 x 30 cm rectangular baking tray, roughly 8 x 12 inches. The shallow depth creates those perfect slab slices ideal for buffets and afternoon tea spreads.
- → Why does my cheesecake crack?
Overbaking or rapid temperature changes cause cracks. The key is removing it when the centre still has a slight wobble—it continues cooking as it cools. Letting it cool gradually inside the oven for an hour also prevents cracking.
- → Can I use fresh fruit instead of dried?
Yes, though dried fruits work beautifully in this festive version. Fresh berries would make a lovely summer alternative—simply fold them in gently before baking to prevent colour bleeding.
- → How do I know when it's properly set?
The cheesecake is done when the edges are set and puffy, yet the centre still wobbles slightly like jelly when gently shaken. It should not be liquid. The residual heat finishes the cooking as it cools.
- → What's the best way to slice clean squares?
Use a sharp knife dipped in hot water and wiped clean between cuts. For the neatest slices, run the knife under hot water, dry it, then make one clean slice through the entire slab.