 Pin It
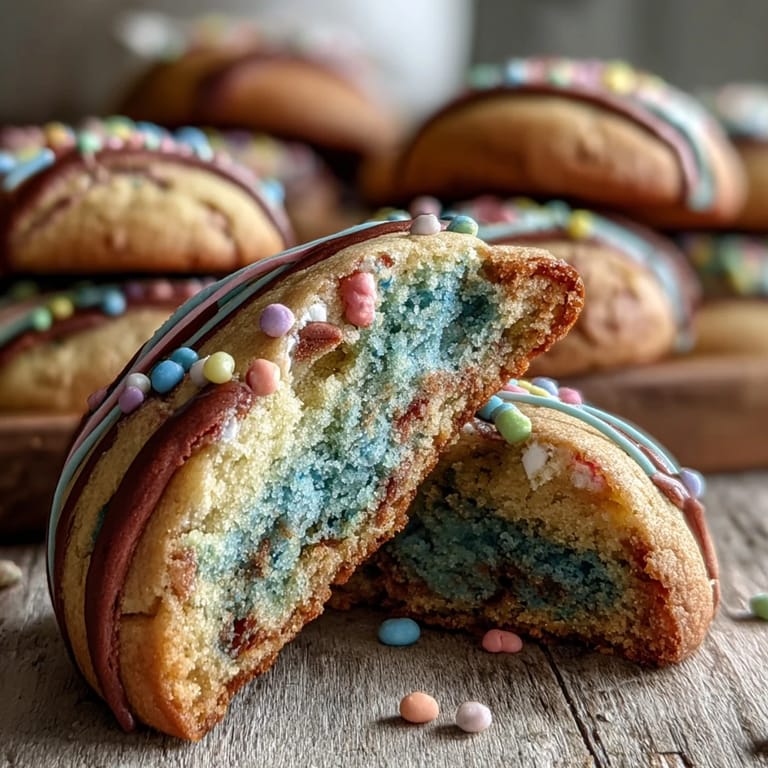
 My niece was obsessed with Cookie Run Kingdom last summer, and when she asked me to make her birthday cookies, I knew they had to be as whimsical as the game itself. I'd never attempted pastel swirls before, but something about twisting colored dough together felt like the right kind of creative challenge. The moment those twisted logs came out of the fridge and I sliced through them to reveal those soft, marbled patterns, I understood why she'd been so excited. These cookies became the unexpected star of her party, and honestly, they've become my go-to when I want to impress without spending all day in the kitchen.
I'll never forget my friend Sarah's face when she bit into one and said, "These are too beautiful to eat," then immediately ate three more. We were sitting in my kitchen on a rainy Thursday afternoon, just talking about life, and somehow these cookies became the backdrop to one of those conversations that matters. That's when I realized the real magic wasn't just the pastel colors—it was that they tasted genuinely good, buttery and tender in a way that made people slow down and actually enjoy them.
Ingredients
- All-purpose flour (2 1/2 cups): This is your foundation, and measuring by weight if you have a scale makes a real difference in consistency.
- Unsalted butter (1 cup, room temperature): Cold butter won't cream properly, so pull it out 30 minutes before you start mixing.
- Granulated sugar (1 cup): Don't skip the creaming step—this is what gives these cookies their tender, melt-in-your-mouth texture.
- Egg (1 large): Room temperature eggs incorporate better and create a smoother dough.
- Vanilla extract (2 tsp) and almond extract (1/2 tsp optional): The almond extract adds a subtle depth that feels fancy without being obvious.
- Gel food coloring in pastel shades: Gel won't water down your dough like liquid coloring does, and pastels photograph beautifully.
- Baking powder (1/2 tsp) and salt (1/4 tsp): These quietly balance the sweetness and help the cookies hold their shape.
Tired of Takeout? 🥡
Get 10 meals you can make faster than delivery arrives. Seriously.
One email. No spam. Unsubscribe anytime.
Instructions
- Combine your dry ingredients first:
- Whisk together the flour, baking powder, and salt in a medium bowl. This distributes the leavening evenly so you won't end up with flat spots or dense patches. Set it aside and forget about it for now.
- Cream the butter and sugar until fluffy:
- In a large bowl with an electric mixer, beat the butter and sugar for about 2-3 minutes until it looks pale and airy, like soft clouds. This step is crucial—it incorporates tiny air bubbles that make the cookies tender instead of dense.
- Add your wet ingredients:
- Crack in the egg, add the vanilla and almond extracts, and mix until the dough looks smooth and combined. If it looks slightly curdled, you're fine—keep mixing and it'll come together.
- Gently fold in the dry ingredients:
- Add the flour mixture to the butter mixture slowly, mixing just until you don't see any white streaks anymore. Stop here—overmixing develops gluten and makes cookies tough, and nobody wants tough cookies.
- Divide and color your dough:
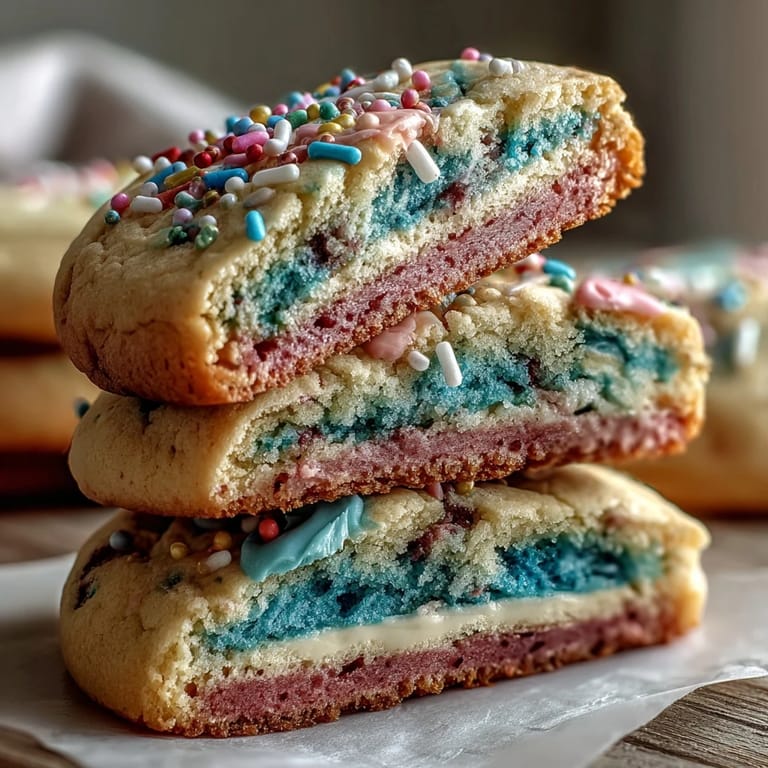
- Split the dough into 3 or 4 portions on your counter, make a little well in each, and drop in a few dots of gel coloring. Knead each portion gently until the color spreads evenly, then wash your hands because your fingers will look like a rainbow.
- Roll and twist into ropes:
- Roll each colored portion into a long rope about 12 inches long, like you're making snakes out of clay. Lay them side by side and gently twist them together, then roll the whole twisted thing into one cohesive log.
- Chill the dough thoroughly:
- Wrap your log in plastic wrap and refrigerate for at least 2 hours—this is non-negotiable if you want clean slices. The cold dough holds its shape and gives you those beautiful swirl patterns when you slice.
- Preheat and prepare to bake:
- Heat your oven to 350°F and line your baking sheets with parchment paper. This prevents the bottoms from browning too fast and makes cleanup infinitely easier.
- Slice and arrange your cookies:
- Using a sharp knife, cut the chilled log into 1/4-inch thick rounds—you should get about 24 cookies. Space them about 2 inches apart on your prepared sheets because they'll spread slightly as they bake.
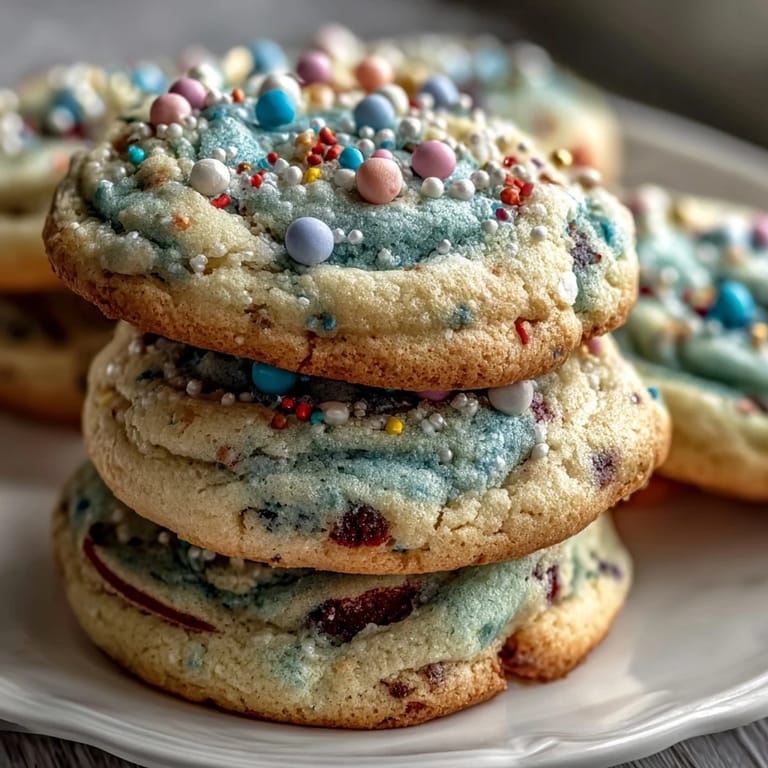
- Add sprinkles and bake:
- Top each cookie with a tiny pinch of pastel sprinkles if you want, then slide them into the oven for 10-12 minutes. You're looking for edges that are just barely golden—they'll keep cooking slightly on the hot pan.
- Cool with patience:
- Let the cookies sit on the baking sheet for 5 minutes so they set, then transfer them to a wire rack to cool completely. This prevents them from breaking apart and lets them develop their final tender texture.
 Pin It
 There's something quietly magical about how a batch of cookies can turn an ordinary afternoon into something memorable. My sister brought her kids over on a random Sunday, and we decorated these cookies together—the kids using sprinkles with the precision of toddlers and the gleeful abandon of people who don't care about aesthetics. By the time we finished, our kitchen looked like a craft explosion, but the joy on their faces made it worth every sprinkle on the floor.
The Science of Tender Cookies
Creaming butter and sugar isn't just a cooking step—it's actually incorporating air into the dough, which creates lift and tenderness. When you mix too aggressively after adding flour, you develop gluten strands that make cookies tough and chewy instead of soft and delicate. The temperature matters too: room temperature butter mixes smoothly, while cold butter fights you and creates lumps. Understanding this changed my entire approach to cookie baking, because suddenly it wasn't just following instructions—it was knowing why each step mattered.
Customizing Your Swirls
The beauty of this recipe is that you can play with color combinations to match any theme or mood. I've made them in soft greens and blues for a garden party, hot pinks and purples for a fun birthday, and even pastels with metallic sprinkles for something more elegant. The key is using gel coloring instead of liquid, because liquid coloring adds moisture and changes the dough's texture. Pastels photograph especially well because they're soft and pretty without being overwhelming, but honestly, bold primary colors work just as beautifully if that's your vibe.
Storage and Make-Ahead Magic
These cookies are genuinely one of the best make-ahead desserts because the dough log stays perfectly in the fridge for up to 3 days before baking, and they freeze beautifully for up to 2 months. I've sliced and baked them straight from the freezer more times than I can count, adding just an extra minute or two to the bake time. Store the baked cookies in an airtight container at room temperature, and they stay soft for up to 5 days—though they rarely last that long in any house I know.
- You can prepare the twisted dough log days ahead and bake fresh whenever you need them.
- If you're in a real time crunch, even 1 hour of chilling helps the dough hold its shape better than not chilling at all.
- Layer the cooled cookies between parchment in an airtight container so they don't crack or stick together.
 Pin It
 These cookies taught me that sometimes the most impressive desserts come from simple techniques done with attention and care. They're the kind of treat that makes people feel celebrated without requiring you to spend your entire day in the kitchen.
Recipe FAQs
- → What kind of coloring should I use?
Gel food coloring is recommended for vibrant pastel hues without affecting dough consistency.
- → How long should the dough be chilled?
Chill the twisted dough logs in the refrigerator for at least 2 hours to ensure firmness for clean slicing.
- → Can I add extra flavor to the dough?
Yes, adding lemon or orange zest to the dough enhances the flavor with a fresh citrus note.
- → How do I achieve the swirl effect?
Divide the dough into portions, tint each with different pastel colors, roll into ropes, gently twist together, then refrigerate before slicing.
- → What is the best way to store these cookies?
Store in an airtight container at room temperature for up to 5 days or freeze for longer preservation.